Showing posts with label Side dish. Show all posts

Monday, March 10, 2014

Summer Special | Beetroot Raita


The summer is upon us and for once I am not really craving for anything hot and spicy or fried to eat in the evenings. A few slices of cucumber or a bowl of watermelon gives me way too much more happiness than what a plate of pakoras can give. I know it is only for the time being and when the Mumbai monsoon unleashes its wrath, I will be back to making hot and spicy food items to satiate the food cravings while watching the rain. For now, am making light food items on a daily basis - things that are packed with cooling vegetables, with lots of fiber and water. As I drew up this week's menu, I figured that I might as well start off a series of the summer recipes that I am making these days to keep the body cool meal after meal. Kickstarting the series is a favorite - beet root raita. I normally make it with leftover beet root poriyal. This time, I made it from scratch I added fresh beets mixed with leftover onion-red chili chutney. It so happens that there is always 2-3 spoons of chutney that remains after breakfast, which certainly is not enough for another meal. So I always add leftover chutney into a raita rather than adding ground or grated coconut. It takes ten minutes to make this velvety pink raita and tastes out of the world.
beetroot raita


Preparation Time: 10 Mins
Cooking Time: 10 Mins

Ingredients to make the Beetroot Raita


1 large beetroot or two small ones, finely chopped/ grated
1 red chili
1 cup beaten curd
1/2 onion finely chopped
salt and sugar to taste
fresh coriander leaves for garnish
Grated coconut - i used leftover chutney
1 tsp oil
1/2 tsp mustard
1/2 tsp urad dal
a pinch of hing

Method to make the Beetroot Raita

Wash and clean the beets. Peel them and run them in a food processor with a red chili or finely grate them.

chopped beetroot

In a pan, heat the oil and add mustard and wait until it splutters. Now top with the urad dal, hing and red chili ( if not added into beetroot) and roast for a minute. Add the beets to this and fry well. Sprinkle some water onto this and let it cook. It takes about five minutes tops.

frying beetroot


While this is frying, beat the curd and add the chopped raw onions to it.
curd with onions

Season the curd with some salt and sugar. Add salt to the beetroot as well.
You need to add lots of fresh coriander into this or any raita to add a lot of freshness and flavor into the dish.
fresh coriander

Now if you are using fresh coconut, you could grate it or whizz it in the mixie with the red chilli and add it to the raita. I had my leftover onion chutney which had onion, coconut, tamarind and red chillies.
red chutney
Now all i did was to let the beets cool. I mixed the beets with the curd, added in the chutney to it, adjusted the salt and garnished it with the coriander leaves!

beetroot raita

You can serve the raita with both rice and roti. You could eliminate the onions if you don't like the smell of raw onions , but trust me, that's what adds the extra taste to it! It is simple to make and really cool on the stomach. What's more, in ten minutes, you have an extra dish on the table! 

Wednesday, February 5, 2014

Lemon Ginger Rasam

There are days when you  have a heavy evening snack and don't really feel like cooking or eating anything heavy for the night. On such days, we do not just settle for good old thayir sadam ( rice and curds), but also have this light and refreshing lemon ginger rasam alongside. The fresh flavors from both the lemon and ginger make it really appetizing even during times when you are feeling under the weather. Instead of garnishing the rasam with coriander leaves, I add the coriander stalks from the "hybrid dhania" that we get here.
hybrid coriander

The stalks are not tender enough to use in curries or gravies. But it can be used in this rasam since it will be crushed in the mortar. The lemon ginger rasam is really light on the stomach and the juices of lemon, coriander and ginger will help you digest your food much better. What's more, it is so easy to rustle up that it figures on my menu at least once in a week!
lemon ginger rasam

To make the rasam, I do not use too much of toor dal. Instead, I use more of the toor dal water. So what I do is that I pressure cook a cup of toor dal with a pinch of turmeric. Then pour 1 and half cups of water into the dal container and give it a swish. Then remove the water separately, along with two tsp of the cooked toor dal. I reserve the rest of the toor dal to make dal the same day. Or it keeps well in the fridge for a week, you can use it on any day you are making a dal or sambar. Once you have this dal water mixture, it takes just five minutes to put together this rasam. Lets see how. 

Preparation Time: 5 Minutes
Cooking Time: 15 Minutes

Ingredients of Lemon Ginger Rasam 

1 and 1/2 cups toor dal water 
2 tsp of cooked toor dal 
1 green chilli, slit lengthwise
1 inch ginger grated or chopped
juice from 1/2 lemon 
2 tsp of chopped coriander stalk
salt and sugar to taste
oil for tempering
4-5 curry leaves
1/2 tsp mustard 
1/2 tsp cumin seeds or jeera
a pinch of asafetida

Method to prepare Lemon Ginger Rasam


Cook about a cup of toor dal and add a cup and half of water to it. Now gently swish the water with a ladle and separate it out from the dal. Take two tsp of the cooked dal and mash it well. Add it to the dal water and set it aside.
toor dal water

In a mortar, crush the ginger and coriander stalk together coarsely.
ginger coriander lemon

Now bring one cup of water to a boil on medium flame. Slit a green chilli and add it to the water, along with the coriander-ginger paste.
boiling rasam


Once it comes to a rolling boil, add the toor dal and water mixture. Add to it salt and sugar to taste. This is a sweet-sour rasam, hence the need for the sugar. Also, sugar enhances the flavor of ginger.
rasam with lemon and ginger


Prepare the tempering by heating oil, add to it the asafetida and mustard. Once the mustard starts crackling, add the curry leaves and jeera. If you like your rasam spicy, you can add some coarsely powdered pepper to the tempering. 
Now pour the tempering on the rasam. Turn off the heat. Adjust the salt and squeeze in the juice of half a lemon into it. 
lemon ginger rasam

That is about it! Enjoy it with steaming hot rice or drink as is as a soup. It is refreshing and light on the stomach. 


Monday, January 20, 2014

Bengali moong dal | Bhaja Muger Dal

Ever since the Bengali Cholar Dal from Dassana's blog was declared a hit at the dinner table, I have been on the lookout for other similar Bengali dishes to break the monotony of the regular tried and tested dals. That's when I chanced upon the Bhaja Muger Dal. This Bengali Moong Dal recipe makes use of fried moong dal. Bhaja in Bengali means "fried". Moong dal is much easier to digest in the night, compared to the channa dal in Cholar Dal, making it a winning combination with roti for dinner. So if you are bored of the regular dal fry or dal tadka and want to try something new, then Bhaja Muger Dal is an excellent option.
After trawling a few bengali cooking websites, I found that the tempering was similar to the cholar dal. So I decided to follow Dassana's recipe itself. It's just got a handful of ingredients going into it. What's more, it is really simple to make and has its distinct taste that comes from the roasting and the tempering.
Bengali Moong Dal

So how does one make the Bhaja Muger Dal ? Here's how.

Preparation Time: 5 minutes
Cooking Time: 30 Minutes
Serves: 4

Ingredients for the Bhaja Muger Dal

1 cup of Moong Dal
2 tbsp ghee / clarified butter
1 bay leaf
1 pod cardamom
2 dry red chillies ( I used the byadgi variety)
1 inch cinnamon stick
2 cloves
1/2 tsp jeera / cumin seeds
A large pinch of turmeric powder
A large pinch of asafetida (optional)
1 inch ginger grated
Salt to taste
Sugar to taste

How to make Bhaja Muger Dal

In a wide pan, add a tbsp of ghee and roast the moong dal in it, till it imparts a nice aroma. This will take about ten minutes. Do not let the dal burn or brown. So that means, giving ten minutes of your undivided attention to the dal, since once this is done, you are pretty much set with your dal. 
Now pressure cook the dal with enough water in a pressure cooker. I cook for two whistles on low flame and then a third on high. It takes about ten minutes to cook a cup of dal.
bhaja muger dal tempering

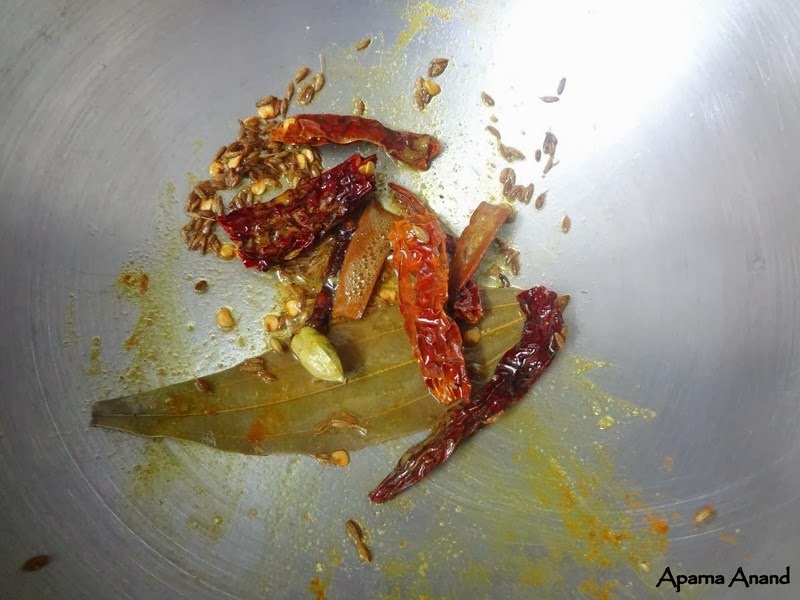
While the pressure in the cooker subsides, you can get started with the tempering. Heat the remaining ghee in a pan and throw in the cloves, cardamom, cinnamon and bay leaf into it. Once their fragrance starts wafting out, add in the rest of the dry spices - jeera, chillies, turmeric and hing. Fry for a minute.
bhaja muger dal tadka

Now top this with the cooked dal. Season with salt and a little bit of sugar. Grate in about an inch of ginger into it. Of late, I have started adding the ginger towards the end of the cooking rather than the beginning. That way, the ginger does not get stuck to the bottom of the pan and its fresh taste is more prominent in the dish.
bhaja muger dal

Simmer for five minutes. Given the presence of spices like cardamom and cinnamon, this dal tends to be a little on the sweeter side. You can up the hotness of the dal by increasing the number of chillies going into it. 
Once all the flavors come together, turn off the gas and serve it hot with phulkas or rice. I served it with methi rotis and a carrot-ridge gourd sabzi on the side. 
bhaja muger dal dinner


Wednesday, January 1, 2014

Under 15 minutes Beans Carrot Poriyal

I love the beans and carrot combination in curries, gravies and rice preparations, especially because of the color. I make this quick poriyal on the day I do my grocery shopping - when the veggies are fresh from the market. I normally cube all the carrots and slice the beans small, use some for the poriyal and freeze the rest to use it up on one of the days of the week. That way, any cooking with these veggies gets done really fast.
So what goes into this poriyal? Nothing much actually - just the veggies, some seasoning and grated coconut on the top. I make this coarse powder out of roasted jeera and pepper in small batches lasting a week which i sprinkle on top of this poriyal. The powder can also be used in the tadka for rasam to make it hot and peppery.
Preparation Time: 5 Minutes
Cooking Time: 10 Minutes

Ingredients 

1 cup carrots, cubed
1 cup beans, sliced in small rounds
1 tsp of cumin-pepper powder
2 tbsp of grated coconut
salt to taste

for the tadka:

1 tbsp of oil
1 sprig of curry leaves
2 red chillies
1/2 tsp mustard seeds
 a pinch of asafetida

Method

Chop the veggies fine and take them in a microwave safe bowl. Sprinkle some water on it.
Now, microwave on high for 2 minutes. This will help in semi-cooking the veggies. In the meanwhile, heat oil in a pan and wait for it to get hot. Throw in the mustard seeds followed by the curry leaves, red chillies and hing.


Once the mustard starts spluttering, add the microwaved vegetables to the pan and mix well. Sprinkle some more water if needed and cover and cook for 5 minutes on medium-high. Remove the cover, add the salt and on high flame, let the curry roast until almost dry for another 2 minutes. Now sprinkle the coconut and cumin-pepper powder from the top.


Toss it well. That is it! Done in 15 minutes flat! Serve it hot with either roti or rice. If it is rice, you are going to need a dal or sambar on the side. I served my carrot beans poriyal with phulkas and it made an awesome combination.


P.S. Sending this as my entry to Healthy Veg Side Dishes event hosted by Nandoo and Priya

Friday, February 8, 2013

Aloo Palak | Lunch Box Series

Lunch box normally comprises 3 rotis and a side dish and a box of curd rice. Side dish is a dal with veggies or some fried sprouts or a vegetables cooked with a gravy. Last week, i decided to take a short cut and cook palak with aloo. Adding potato to anything makes it instantly tasty! Its not really great for the stomach, but once in a way chaltaa hai :)
One more advantage of making a potato dish is that it cooks really easily and all the flavors are absorbed really well into it.
So here goes a really easy side dish for the lunch box. I decided to put together the lunch dabba dishes under the tag,  Lunch Box Series.

Preparation Time: 15 Minutes
Cooking Times:    10 Minutes

Ingredients:

3 large potatoes, cut into large pieces
2 bunches of palak, washed and clean
1 small onion cut into thin slices
1 tbsp Oil
1 tsp Jeera
1 tsp mustard seeds
A pinch of hing
1 tsp chopped ginger
1 tsp chopped garlic
1/2 tsp cumin powder
1/2 tsp turmeric powder
1 tsp coriander powder
1 tsp of red chilli powder
Salt to taste
Chat Masala to taste (optional)
1 tsp Lemon Juice (optional)

Method:

Place the chopped potatoes in a pressure cooker, with some salt and water and pressure cook until one whistle. While that is cooking, chop the greens and onions. In a pan, add the oil. Once it heats up, add mustard, jeera, turmeric powder and hing.


Once the jeera starts browning, add to it the sliced onions, garlic and ginger.


Once the onion turns pink, add to this the chopped spinach. Fry it until it just about wilts. Now add to this the cumin powder, coriander powder, salt and chilli powder.


Stir for 2-3 minutes. It doesn't need to be cooked for too long. All you need to do now is to add the cooked potatoes to this mixture!


Mix gently depending on how much your potatoes have cooked. Make sure that the palak leaves are not bunched up together but are mixed well with the potatoes. Sprinkle some water to this and cover and let it cook for 2-3 minutes. This will ensure that the masala that is in the palak will stick to the potatoes.
Turn off the heat. Add some lemon juice or chat masala on top as per your taste. Serve hot with rotis.


Carry it in your dabba, heat it up just before eating and enjoy hot aloo with rotis. 

Wednesday, February 6, 2013

Foxtail Millet with Jaggery

I thought a while whether i could call the recipe a pongal. But it was not really a pongal. So i said i would just go with Foxtail Millet and jaggery, cause that is all this simple dish needs.

A friend got a small packet of foxtail millet for me from an organic food store. Unfortunately, it had the husk intact and i could not really make much out of it. I spotted the millets at an organic store in Mysore later and picked a packet up at once. When i got back home to proudly show the mother a new millet discovery, she stumped me by saying that it is called Korai/ korra biyyam and used to be used much in the olden days.
After doing some research, i saw that it was cooked a lot like rava or broken wheat. I was sure that i wanted to make a sweet dish out of it, cause it has the kind of mild sweetness that ragi has.
The recipe is really simple, needs minimum ingredients and gets done super easy.

Preparation Time  10 Mins
Cooking Time       20 Mins

Ingredients

Foxtail Millet/ Korra Biyyam     1/2 cup
Ghee                                        1 1/2 tbsp
Grated Jaggery                         1/4th cup, increase as per taste.
Dry coconut/ kopra                  1/4 cup, chopped into tooth size bits

Method:

I just added the millet into the rice cooker and poured twice the amount of water and allowed it to cook.
Once done, transfer into a microwave safe bowl, add to it the jaggery shavings and a tbsp of ghee.
Microwave on high for two mins. That is about how long it takes for the jaggery to melt. Mix well so that the liquid jaggery comes together well with the millet and also lends it its color. Fry the dry coconut in the remaining ghee and add it to the mixture.
It makes for a good 11 o clock snack or a light after meal snack when you crave for "something sweet". Pack it in a dabba and carry it as a sureshot solution for that odd timing hunger pang.

I thought i could also try a slightly richer version with some more ghee, cardamom and nuts and make it as a prasadam for any festival. Light, flavorful, easy to make, healthy and a welcome change from the regular grains!

Tuesday, January 29, 2013

PuLi Inji

One of my favoritestest traditional side dishes is PuLi Inji - literally translated to Tamarind Ginger. I have refrained from trying such a dish till date because these traditional recipes call for very minimum ingredients and one needs to get the mix and balance of all the flavors spot on for the dish to turn out well. The past week, i tasted it twice, first at New Krishna Bhavan then next when a friend made it.
And then the recipe came up as a suggestion when i was reading Chinmayie's latest post. It seemed like a sign and yours truly decided to make the PuLi Inji.
The recipe is adapted from here . I followed the same measurements.

Just that, i made a tadka with mustard, hing and curry leaves first. Added ginger and chilli next.

To it, i added the tamarind pulp and melted jaggery and brought it to a boil.
Then stir it well and let it simmer for a while.Adjust salt and jaggery and tamarind. Easier said than done. Each time you add one item, the other starts appearing to be less. So it will take you a couple of additions to get the right proportions that suit your palette best.  The consistency that you are looking for is gooey and thick. There will be a slight glaze on the surface of the syrup.
At this point, turn off the heat. Transfer to a box or a bottle. This can be stored for a while. But when the quantity is just a cup, be sure for it to be licked clean sooner!
Serve with Pongal/Khichdi, or with plain rice and a big dollop of ghee. Or better still, make it a perfect accompaniment for curd rice!


Strawberry Sauce | A quickie

If you go grocery shopping to the supermarket, you can't miss the strawberries these days. Not just the big stores, even the local fruit vendors are selling the ubiquitous boxes of the pretty red fruits. But it always so happens to me that if the fruit is sweet, a couple of them in the box turn out to be bad. Sometimes it so happens that the fruits look nice and plump but are sour on the inside.
When they are sweet, i can't think of a better way to eat them than by dipping them in chocolate sauce. Heaven is right there. When i was faced with the prospect of finishing some not-so-sweet strawberries lest they went bad, i thought of turning it into a sauce.
To me, any sauce or chutney should be a good balance of uppu-puLi-kaaram-inippu (salt, sourness, heat and sweet, in that order ). So this simple sauce had the sugar for the sweetness, pepper lending heat, ginger adding a tang and the strawberry itself a little sour.
No measurements actually. Just take a ramekin. Go chop chop and add the strawberries upto 3/4th the cup. Add a spoonful of sugar or more according to your preference, some salt and pepper to taste, dry ginger powder and maybe some unsalted butter on top. Well, all you need to do now is to microwave this for a minute and a half.
Ta-da! Your sauce is ready!

You could make it overtly sweet, like a jam. Or keep it light and make it a nice mix of different fresh flavors. Maybe even try it with some mint. Serve it for breakfast with toasted bread or pancakes.

Saturday, December 8, 2012

Easy Cut Mango Pickle

I was in for a surprise recently when my neighborhood grocery store started stocking banana flower, raw mango, fresh turmeric, kumquat and many other veggies and fruits that i generally don't get to see. So though it was off season, i bought one raw mango to give the cut mango pickle a try.

Preparation Time - 15 Mins

Ingredients

Raw Mango           1 No.
Salt                        1 tsp
Red Chili Powder   1 tsp
Mustard                 1 tsp
Fenugreek Seeds   1/2 tsp
Hing                      a big pinch
Oil                         for tempering

Preparation

Wash the mango and wipe it dry. Chop it into bite sized pieces.
Now add to this the salt, chili powder and asafoetida. Mix well and leave for a few minutes.
In your tadka ladle, add the oil. One it starts smoking, add in the mustard. When it splutters, add the crushed fenugreek seeds.

 Turn off the heat. Pour it on the mango. Mix well. Transfer the mango into a sterilized glass bottle. 

This takes just a couple of minutes to put together. Adds a tang when accompanied with rice or roti. Stays for a week when refrigerated. But since it is not very heavy on oil and spice, one tends to eat more of it. So a small batch like this,will get finished before you know it!
My favorite way of eating this is with potato chips.

Wednesday, November 28, 2012

Quick Chole Masala

I have had the pleasure of eating some really yummy chole made by friends and neighbors. My mom normally makes the chana as sundal or in a coconut based gravy. And for some reason, i don't really pick the  kabuli chana too often while buying grocery. This time around, determined to give the chole a try, i picked up chana and Everest Chole Masala. I did not really do too much research for the recipe - just flipped the masala pack and found instructions for cooking. I tweaked it a bit to make it real quick and easy!

Preparation Time  10 Mins
Cooking Time       15+15 Mins

Ingredients 

Kabuli Channa  - 1 cup, soaked overnight
Onion               -  2 small
Tomatoes         -  3 small
Ginger              -  1 inch piece
Garlic               - a couple of pods, optional
Green Chillies   - a couple, as per your desired level of spice
Dhania Powder - 1 tsp
Chana Masala   - 1 tsp
Salt                   - to taste
Kasuri Methi     - for garnishing
Coriander Leaves- for garnishing
Amchur             - 1/2 tsp

For Tempering 
Oil                      1 tbsp
Butter                  1 tsp
Jeera                    1 tsp
Hing                    One pinch

Preparation
Wash the soaked chana and pressure cook with some salt and water for two whistles.
Since i wanted to take the easy way out, I skipped the chopping and took to grinding the ingredients. I had found fragrant fresh turmeric when i had gone to buy this week's veggies. I added that also for good measure for its color and flavor. So i ground together the onions, garlic, ginger, chillies and the turmeric coarsely.

In the pressure cooker, heat the oil and add jeera and hing. The original recipe does not call for hing to be used. But i develop severe gas trouble on making anything with too much aloo or pulses. Hence the precaution by adding the asafoetida.
Now add to it the ground mixture and fry for 5 minutes. Once the onions start browning, puree the tomatoes and add them to the onion. Saute for another 5 mins. Add the chana masala and the coriander powder to this and fry for a couple of minutes.
Adjust the salt and add the cooked chana to this. Add extra water since we need the final product to be slightly watery.
Close and pressure cook for another 2 whistles. This will ensure that the chana is well cooked and the masala is incorporated well into it. After the pressure releases, top it with some kasuri methi and amchur powder. Mix well. Garnish with coriander leaves. Serve piping hot with garma garam rotis and a dollop of butter.