Tuesday, January 28, 2014

Mango Phirni Recipe

I really love the fact that I have super helpful neighbors. When I had to cut short a function in the apartment complex due to unexpected visitors and was at a loss for what to make in a hurry, a neighbor walked back along with me and gave me a big bowl of paddu/paniyaram batter. I had to return her vessel and again I was left wondering what to make. Normally, when giving back the vessel, you put something sweet into it and do not return it empty. While I was thinking of what is the simplest sweet dish that I can make, my eyes fell upon the mangoes in the fruit basket and the easiest sweet I could think of making with it was Mango Phirni - totally my kind of dish- takes less than half an hour to make.
mango phirni


The phirni is an Indian Rice pudding that is normally served in earthenware and is topped with chopped nuts. It is made from a base of milk and ground rice. Rose water or Kewra Water is normally used to add flavor to the phirni.  It is not overtly heavy on the stomach and you can eat a whole cupful without too much guilt. Mine is not the traditional dish. First of all, it has mangoes in it. These days, the mango phirni that is served in the restaurants has mango puree in it. I could not be bothered with making puree, so I just added chopped mangoes into it. It is nice to bite into chunky pieces of mango while eating the phirni. Garnish can be done with the nuts of your choice. I added blanched almonds just before serving the mango phirni.

Preparation Time: 10 minutes ( excluding soaking time)
Cooking Time: 20 minutes
Cooling Time: 1 hour
Serves 4

Ingredients for Mango Phirni

3 cups milk 
3 tbsp Basmati Rice
5-6 cashewnuts (optional)
8 tsp sugar 
1 mango chopped 
A large pinch of cardamom powder
Nuts for garnish 

Method to make Mango Phirni

Soak the Basmati Rice in water for about an hour and half. 
rice phirni

Once done, start boiling the milk. While the milk is boiling, grind the rice to a fine paste in the mixer. Make sure there are no grains. You could add a few soaked cashewnuts too to this while grinding. 

rice paste phirni


When the milk almost comes to a boil, add to it the sugar and the rice paste. Now start mixing everything together and keep stirring constantly. It is best to do it with a whisk. Add the cardamom powder into it too. As you are stirring it together, you will be able to feel the resistance building up.


Whisk it on low flame for about fifteen minutes. By now it would have considerably thickened. Turn off the heat. At this point, I transferred it to individual containers for the two of us and the rest into her bowl.

Allow it to cool for about half an hour. Now chop up the mangoes into small cubes. These go into the chilled phirni.

mango pieces

Top the phirni with a spoonful of mango cubes.

mango phirni

Mix the mango cubes well into the phirni. Garnish it with the chopped nuts and refrigerate again for at least half an hour. Upon refrigeration, it gets set and you can cut it from the kulhad with a spoon and enjoy a simple yet fulfilling dessert.

mango phirni


Monday, January 20, 2014

Bengali moong dal | Bhaja Muger Dal

Ever since the Bengali Cholar Dal from Dassana's blog was declared a hit at the dinner table, I have been on the lookout for other similar Bengali dishes to break the monotony of the regular tried and tested dals. That's when I chanced upon the Bhaja Muger Dal. This Bengali Moong Dal recipe makes use of fried moong dal. Bhaja in Bengali means "fried". Moong dal is much easier to digest in the night, compared to the channa dal in Cholar Dal, making it a winning combination with roti for dinner. So if you are bored of the regular dal fry or dal tadka and want to try something new, then Bhaja Muger Dal is an excellent option.
After trawling a few bengali cooking websites, I found that the tempering was similar to the cholar dal. So I decided to follow Dassana's recipe itself. It's just got a handful of ingredients going into it. What's more, it is really simple to make and has its distinct taste that comes from the roasting and the tempering.
Bengali Moong Dal

So how does one make the Bhaja Muger Dal ? Here's how.

Preparation Time: 5 minutes
Cooking Time: 30 Minutes
Serves: 4

Ingredients for the Bhaja Muger Dal

1 cup of Moong Dal
2 tbsp ghee / clarified butter
1 bay leaf
1 pod cardamom
2 dry red chillies ( I used the byadgi variety)
1 inch cinnamon stick
2 cloves
1/2 tsp jeera / cumin seeds
A large pinch of turmeric powder
A large pinch of asafetida (optional)
1 inch ginger grated
Salt to taste
Sugar to taste

How to make Bhaja Muger Dal

In a wide pan, add a tbsp of ghee and roast the moong dal in it, till it imparts a nice aroma. This will take about ten minutes. Do not let the dal burn or brown. So that means, giving ten minutes of your undivided attention to the dal, since once this is done, you are pretty much set with your dal. 
Now pressure cook the dal with enough water in a pressure cooker. I cook for two whistles on low flame and then a third on high. It takes about ten minutes to cook a cup of dal.
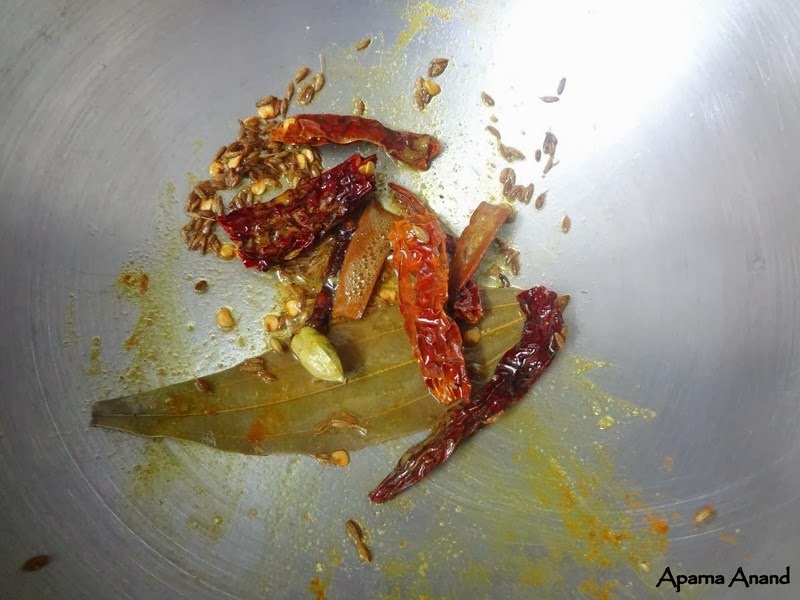
bhaja muger dal tempering

While the pressure in the cooker subsides, you can get started with the tempering. Heat the remaining ghee in a pan and throw in the cloves, cardamom, cinnamon and bay leaf into it. Once their fragrance starts wafting out, add in the rest of the dry spices - jeera, chillies, turmeric and hing. Fry for a minute.
bhaja muger dal tadka

Now top this with the cooked dal. Season with salt and a little bit of sugar. Grate in about an inch of ginger into it. Of late, I have started adding the ginger towards the end of the cooking rather than the beginning. That way, the ginger does not get stuck to the bottom of the pan and its fresh taste is more prominent in the dish.
bhaja muger dal

Simmer for five minutes. Given the presence of spices like cardamom and cinnamon, this dal tends to be a little on the sweeter side. You can up the hotness of the dal by increasing the number of chillies going into it. 
Once all the flavors come together, turn off the gas and serve it hot with phulkas or rice. I served it with methi rotis and a carrot-ridge gourd sabzi on the side. 
bhaja muger dal dinner


Sunday, January 12, 2014

I recharged my Hair and fell in love with myself

If you have great hair and flaunt a good hairstyle, it is half the battle won when you are beginning your day. Battle, did I say? Yes, of course. For us women, each day is a battle with our hair. There are days when they look dull, days when they look all oily and chipku and times when you want to pull all of them out they do not get tamed at all!

I have had my fair share of bad hair days, so much that they lasted all through the year. The tresses were long but lacked volume, not allowing me to style them as I pleased. They lacked the bounce and natural shine. I was sentimental about chopping off the length and ended up with a plait every single day. It was convenient, hid my hair issues, was the best solution when in a hurry. I ride a two wheeler, so loose hair under the helmet means working overtime on your hair to ensure it looks right. So the easiest way to deal with my hair was to braid the hair and walk out. After a point, I stopped caring about my hair and because of it my overall style quotient took a nosedive every single day. 

Add to that all the noise I was hearing about parabens and the scare about the effect on my health from all the accumulated parabens in my body wash, body lotion, sunscreen, shampoo and conditioner. I swore off  all the cosmetics that had parabens and started looking for natural alternatives. The natural alternatives meant an inconvenient half hour of hair washing and yet the hair oil would show no signs of going off. Hair washing, which is supposed to be a happy and rejuvenating experience turned out to be something I was not really looking forward to, since I knew very well that one wash was not going to be sufficient with the hair wash powder. It was also leaving my hair brittle and dry. Not just me, the husband also became a victim of my paraben-free product obsession. He'd dutifully scrub his hair with the hair wash powder but I could tell that he was not really happy about it. It got me praying for some new product that was filled with the goodness of nature that would come to my rescue and be life altering. 

So here I was, stuck with hair that was dull and lifeless, an excuse in the name of a hairstyle, pictures from trips that did not radiate the same happiness that I was feeling from travelling and a grumpy faced husband on his hair wash days. Adding insult to injury, imagine my horror when a neighborhood kid referred to me as "Aunty"!! That was the last straw! I wanted to bury myself somewhere deep and never be visible again. 

Enter my neighbor who is also an owner of a salon. She took a look at me at the corridor one day and said, "That's a nice dress you are wearing, but you should do something about your hair. It certainly doesn't go well with the clothes you are wearing, you need more volume on your head and need to trim those split ends. Your hair looks dull and needs more nourishment ma". I knew that in her mind she had written me off as a lazy person who did not care one bit about my hair. She asked me to pay her a visit at the salon one of the days.  
I thought about it and said to myself that I could give her suggestion a try and go in for a haircut. It will grow back anyway, if I did not like it. And I paid her a visit. She asked me how far I was willing to go with regards to how much hair she could chop off. I showed her and submitted myself to her able hands. Chop chop she went and lo and behold, transformed me in half an hour from someone who was called "Aunty" to a younger looking and a more buoyant me. My hair suddenly started looking fuller and bouncy. I did a small twirl in front of the mirror and could not stop feeling smug!

The lady then understood my problem with hair products and told me about many paraben-free shampoos available in the market, the newest among them being Sunsilk Natural Recharge, which comes with the Ginseng Root Extract that helps control hairfall and naturally recharges your hair. She told me that I could stop worrying about hair going awry or getting clumped a day after washing it. That this one product with its conditioner would be enough to take care of all my hair needs. That I did not have to spend hours together anymore trying to get oil off my hair. And after shampooing, I can just stop worrying about my hair and go ahead and do what I want with my hair.

I can now happily go and lather up my hair without worrying about parabens in the shampoo and also tell the  husband that he can go back to using shampoo. And I can let my hair frame my face and fall on my shoulders cause they look healthy and look like they are being taken care of. Hair care has become so much more easy. It is not hair washing anymore but is shampooing. My hair feels much more stronger and shinier.

Not just my hair, I myself have regained the bounce in my step. I am now more confident and feel much better when I dress up, cause a change in the hairdo has totally changed the way I look. This is what I had needed for the longest time. A different hair cut and some tender loving care for the hair and its a new ME altogether. I did not know that such a small change would make me so happy. My pictures now look so much better. I look younger than my years. I smile more when I look at myself in the mirror, cause I like what I see. That smile stems from the confidence that you are looking really good.  And isn't that what all of us want at the end of the day - Another reason to be happy? I now know that all it took to recharge my life was to recharge my hair!

This post is written for the Recharge your Hair contest conducted by Indiblogger in association with Sunsilk


Thursday, January 9, 2014

Healthy Watermelon Dosa

What do you do with the watermelon peel after you have eaten up the juicy fruit? Or what do you do if unfortunately your watermelon is not sweet and ends up tasting like cucumber? Well, you make a dosa out of it either ways! The watermelon that I had picked up in this weeks grocery was nice and juicy. Once I finished chopping up the watermelon into slices, I was sighing at the amount of peel that had to be trashed. That's when I remembered about this watermelon dosa that is made in parts of South India. What is done is, the white part of the watermelon, remaining after the red part is cut out is ground with the dosa batter to make a Healthy Watermelon Dosa.
Healthy Watermelon Dosa

Ingredients for Watermelon Dosa

2 cups of Dosa Rice or Parboiled Rice
1 cup of watermelon peel
1/2- 3/4 cup of coconut shavings
Salt to taste
Oil for greasing

Method to make Watermelon Dosa

In order to make the dosa, soak two cups of Dosa Rice/ Parboiled rice in enough water for about 4 hours. Coming to the watermelon, make sure that you had washed your watermelon thoroughly before you started cutting it. After you have scooped out the inner flesh for eating, gather your watermelon peel. Proceed to use a peeler and peel out the green part of the outer cover of the watermelon. What will remain is the white portion. You need about one cup of this peel. Grate some coconut such that you get about 1/2 to 3/4 (the more you add, the softer your dosa turns out) cups of coconut shavings.

dosa rice watermelon dosa
Grind all these ingredients to a fine batter, adding very little water, since you get enough water from the watermelon itself. What you get is a light pink dosa batter that you need to leave for a couple of hours to ferment. The batter will not rise like the regular dosa batter since we do not add any urad dal to this.
I generally soak the rice in the evening, grind it in night before sleeping and use it for breakfast the next day.

To make the dosas, heat your griddle and pour a little oil on it. Now pour a ladle of the dosa batter on the griddle and with gentle hands spread it as thinly as possible. Remember that the batter will be a little runny and the dosa is not as easy to make as the urad-rice dosa. If you use a non-stick pan, you can pour the batter and swirl it around like how you make a crepe.
how to make watermelon dosa


Pour a few drops of oil over the dosa. Cover it and allow it to cook for a minute. Now flip the dosa. Cook it evenly on both sides such that it gets a light brown tinge here and there.
making watermelon dosa

That's about it. Your healthy watermelon dosa is ready to be served. I served it with some fiery hot red-chilli peanut chutney and a spoonful of sweet liquid jaggery.

Watermelon Dosa Recipe

Saturday, January 4, 2014

Aloo Methi Paratha for Breakfast

It is not everyday that I make aloo parathas for breakfast. Methi or radish is ok, but the whole potato filling coupled with curds on the side tends to make me lethargic through the early morning. So aloo paratha is reserved for the weekend and makes for an awesome lip-smacking breakfast.
Make it at home and you will be able to down a sizable number of parathas cause they are lighter than the ones at the restaurant and also come with the goodness of being homemade. This time, I added some methi that was lying in the fridge to the mix to make a wholesome Aloo Methi Paratha for breakfast.

aloo-methi-paratha-1

Ingredients for Aloo Methi Paratha

For the stuffing:

3 potatoes pressure cooked and mashed
1/2 cup of fenugreek leaves
2 green chillies thinly sliced
1 inch ginger grated
1/4 tsp turmeric powder
1/2 tsp jeera powder
1/2 tsp of ajwain
a pinch of chat masala powder
Salt to taste
2 tbsp of chopped coriander leaves
1 tbsp oil

For the dough:

2 cups of wheat flour
1 tsp salt
Water as required
1 tsp oil

Method to make Aloo Methi Paratha

Make a stiff dough out of the wheat flour and salt mixture by adding water to it. Knead really well, for about ten minutes. Top with a tsp of oil and knead again. Cover and keep it aside.

Wash and chop the methi well. 
methi fenugreek leaves


Now, in a bowl, take the potatoes, chillies, coriander, ginger and mix it well together. 
aloo methi paratha stuffing

In a pan, heat some oil and add to it the chopped methi. Add turmeric, jeera powder, ajwain to this and stir for minute. Turn off the heat and add this to the potato mixture. Sprinkle some chat masala on top and adjust the salt. Knead it really well without any lumps such that all the masala is uniformly mixed together.

aloo methi paratha stuffing

Divide the stuffing into equal sized balls. Roll out the chapathi dough slightly and place one medium sized ball of the stuffing in the center.
aloo paratha rolling

Fold the edges together and seal it back and roll out the paratha with soft hands.
aloo methi paratha rolled out

On a hot tava or griddle, cook the paratha evenly on both sides on low flame by brushing a little bit of ghee on each side. The ingredients mentioned here make 6 large sized parathas since I make my parathas a little thinner so as to keep them light.

Cut the paratha into halves and serve hot with some mango pickle or chutney and a cup of curds on the side.

aloo methi paratha plating

P.S This is my entry to the Healthy Veg Side Dishes event hosted by Nandoo's Kitchen and Priya 

Wednesday, January 1, 2014

Under 15 minutes Beans Carrot Poriyal

I love the beans and carrot combination in curries, gravies and rice preparations, especially because of the color. I make this quick poriyal on the day I do my grocery shopping - when the veggies are fresh from the market. I normally cube all the carrots and slice the beans small, use some for the poriyal and freeze the rest to use it up on one of the days of the week. That way, any cooking with these veggies gets done really fast.
So what goes into this poriyal? Nothing much actually - just the veggies, some seasoning and grated coconut on the top. I make this coarse powder out of roasted jeera and pepper in small batches lasting a week which i sprinkle on top of this poriyal. The powder can also be used in the tadka for rasam to make it hot and peppery.
Preparation Time: 5 Minutes
Cooking Time: 10 Minutes

Ingredients 

1 cup carrots, cubed
1 cup beans, sliced in small rounds
1 tsp of cumin-pepper powder
2 tbsp of grated coconut
salt to taste

for the tadka:

1 tbsp of oil
1 sprig of curry leaves
2 red chillies
1/2 tsp mustard seeds
 a pinch of asafetida

Method

Chop the veggies fine and take them in a microwave safe bowl. Sprinkle some water on it.
Now, microwave on high for 2 minutes. This will help in semi-cooking the veggies. In the meanwhile, heat oil in a pan and wait for it to get hot. Throw in the mustard seeds followed by the curry leaves, red chillies and hing.


Once the mustard starts spluttering, add the microwaved vegetables to the pan and mix well. Sprinkle some more water if needed and cover and cook for 5 minutes on medium-high. Remove the cover, add the salt and on high flame, let the curry roast until almost dry for another 2 minutes. Now sprinkle the coconut and cumin-pepper powder from the top.


Toss it well. That is it! Done in 15 minutes flat! Serve it hot with either roti or rice. If it is rice, you are going to need a dal or sambar on the side. I served my carrot beans poriyal with phulkas and it made an awesome combination.


P.S. Sending this as my entry to Healthy Veg Side Dishes event hosted by Nandoo and Priya